Getting started with structured content management can be daunting: you’ve been tasked with completely overhauling your organization’s content strategy. There are so many things to consider that deciding where to begin can seem like one of your biggest challenges.
There are plenty of clichés appropriate to this situation: the journey of a thousand miles begins with a single step, don’t try to boil the ocean, and so on. By thinking about the project as a whole, it’s easy to become overwhelmed.
In this article, I’ll give you some ideas for getting started in small, manageable steps, without ever losing sight of your vision.

Step 1: Articulate your vision
Always be ready with an “elevator pitch” for exactly why structured authoring is important for your organization. Is your goal to drive down localization costs? Promote consistency in your content and increase speed to market? Single sourcing? Most DITA projects start with goals like that – ROI driven examples of “doing more with less.”
There are, however, some loftier goals you can set for yourself. Maybe you want to deliver a knowledge base with faceted search to empower your customers (and, by the way, take pressure off your call center). If you’re really looking to the future, you might start thinking about how artificial intelligence can drive new experiences for your customers with chatbots that learn on the fly.
Write this vision down in a nice bold font, and talk about it whenever you can. It’s what should be driving every decision you make from now on.
Step 2: Pick the right pilot project
It is impossible to stress enough the importance of picking the right pilot project. Sometimes, this decision is made for you: whichever department has the money will be your pilot project. But even within that type of constraint, you’ll normally have some amount of freedom to choose a particular document or product.
The most successful DITA projects I’ve seen have all started small. Choose a medium-sized document of average complexity and spend some quality time with it. Using this first document as your guide, come up with some general answers to basic questions:
- What is a topic? Avoid making topics too big (several pages) or too small (individual sentences).
- What are your deliverables? Do you need to create documentation for print and the web? Don’t forget to include future deliverables that might be part of your vision (knowledge bases, chatbots).
- Who will be authoring the content? Technical writers may be comfortable writing DITA content, but think about your subject matter experts as well. Learning a new tool and a complex markup language like DITA isn’t for everyone – and may represent a significant barrier to wide adoption of your new system.
Depending on your comfort level with DITA, this is the point where you may consider bringing in a consultant. A consultant can be a great resource for helping you define your information architecture, getting your first document converted to DITA, and so on.
Alternately, if you’re already working with one or more tools vendors, ask them if they can help you with a proof of concept exercise. Vendors have a vested interest in your success, and they know best how their system works. Let them guide you as you learn, but make sure you define reasonable, achievable success criteria. Remember that no DITA solution is going to provide you with production-ready, branded deliverables right off the shelf.
Step 3: Keep it simple
When I was first figuring out “how to DITA,” I found it very helpful to focus on the basics, and you will too. Create a small map with just a handful of topics – but use “real” content that’s representative of what you’ll be creating with the tool. If you picked a good pilot project, use that content.
The list of DITA elements is long, but don’t let it scare you. Chances are you’ll only need a subset of the available elements. Avoid non-semantic elements (bold, italic, underline) wherever possible. For example, if you write software documentation, chances are you’ll find extensive use for DITA’s uicontrol element. Your style guide might say that UI elements are always bold, but style guides change. You’ll never regret using the right element for the right content.
Unless you have a very good reason, avoid advanced DITA features like scoped keys, conkeyref, and so on for the time being. While these features are very powerful and certainly have valid use cases, they also add complexity to your pilot project that increases your risk of failure.
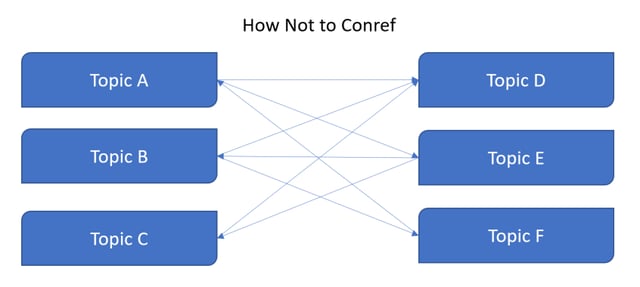
If you’re going to use content references (conrefs), make sure you have a sound, sustainable strategy. Don’t make the mistake of creating “conref spaghetti,” with references pointing all over the place as shown below.

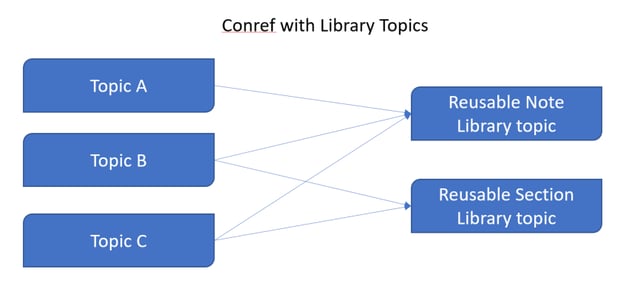
Instead, created a limited number of conref “library topics” and use them to store your reusable content. This keeps your topic relationships clean, easy to maintain, and prevents expensive troubleshooting down the road.

If you keep all your reuse arrows pointing in the same direction, your content will be much easier to maintain in the long run.
At this point, your goal is to get your pilot content broken down into maps and topics, learn how to work with it, and finally generate output (PDF, HTML, etc.) from it. You can always add advanced reuse, content filtering, etc. later.
Step 4: Learn from your mistakes, and don’t forget the vision
Your pilot project is the best time to make mistakes – and you WILL make them. That’s where best practices come from. Your output will fail because you accidentally included a space or a special character in a file name. A file name was changed, and now all references to that file are broken. No problem! Now you know better for next time.
The important thing is to learn from your mistakes, and always keep your vision in mind. You CAN boil the ocean – as long as you do it a little at a time.


